Lithography
Planographic printing refers to artistic techniques such as lithography, algraphy, zincography (on aluminum or zinc plates), grano, collotype and offset printing. Printing and non-printing elements are at the same height: the principle of this printing process is based on the contrast between fat and water.

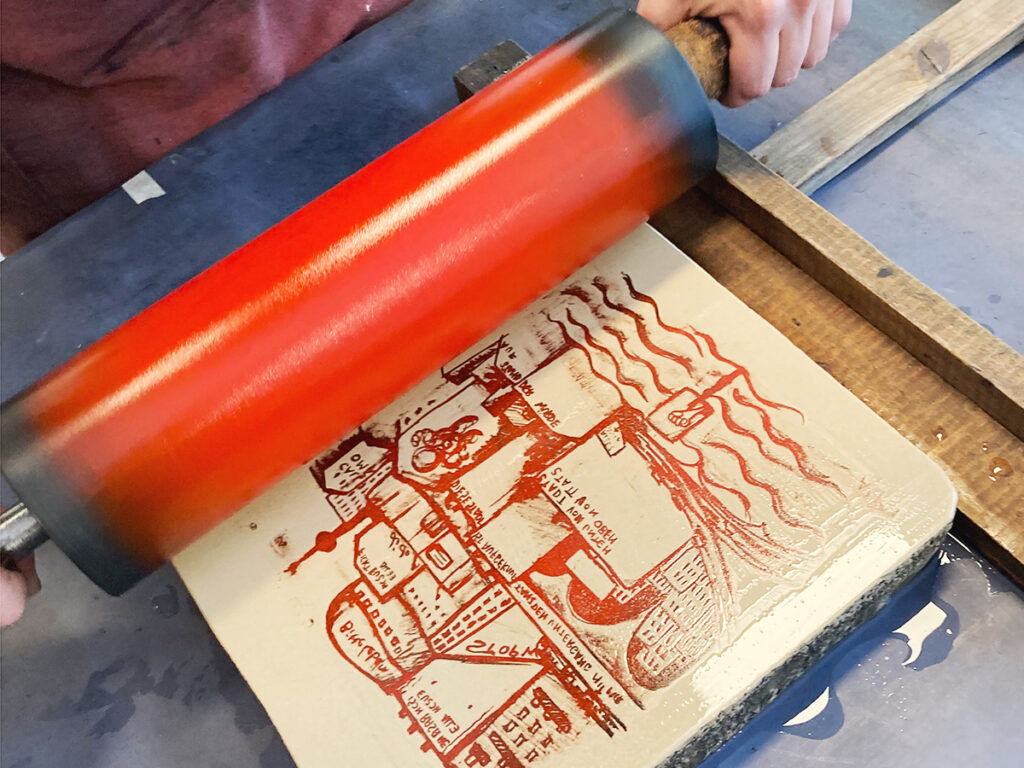
Stones ranging in size from 13 × 16 cm to 43 × 62 cm are available in the studio. The preparatory grinding must be carried out manually. Other tools as well as various lithographic inks and chalks are available. Printing is done on a stone rubbing press made by Erasmus Sutter in 1839 with a carriage format of 83 × 108 cm.

Explanation
Lithography (lithos = »stone« and graphein = »to write«) is the basic and most widespread type of planographic printing in the graphic arts. It is a beautiful and at the same time simple technique, which is closest to drawing on paper and faithfully captures the character of the artist’s handwriting.

The principle of lithography is based on the contrast between fat and water – fat and water repel each other. The image to be printed is applied to the prepared stone with a fatty material. The stone is etched with a solution of gum arabic, water and nitric acid (chemical preparations) so that non-printing areas hold the water better and printing areas repel the water better.
Technical procedure
The best-known lithographic techniques are chalk, pen and brush drawing, wash, spray technique, mezzotint technique, squeeze-out technique, transfer printing (autography), detachment technique.
1. Grinding and preparation of the stones
The process of sanding is intended to make the stone even, remove the old pattern optically and chemically and prepare it for a new pattern. Corundum sand in grain sizes 80 (coarse), 120-180 (medium) and 240 (fine) is used as the abrasive. We use 15% acetic acid on the dry stone for deacidification (removing the chemical structure of the old drawing/grease particles) between the 1st and 2nd coarse sanding, after which the stone must be rinsed well again. We check the evenness of the stone with a steel ruler and round the edges with a fine file. This is followed by medium sanding, rinsing, fine sanding and rinsing the stone again.
To produce a chalk drawing, the stone must be grained. For this we use corundum (medium) and a little less water than for grinding. For a transfer the stone should be matted (fine grain/more water) or pumiced (pumice stone), for a pen drawing it should be matted or polished (sanding with 240 or finer sand or polishing stone) and for an engraving it should be polished. This last step should take place shortly before marking, as the stone must be »fresh« – otherwise it will be less receptive to grease due to the effects of oxygen.
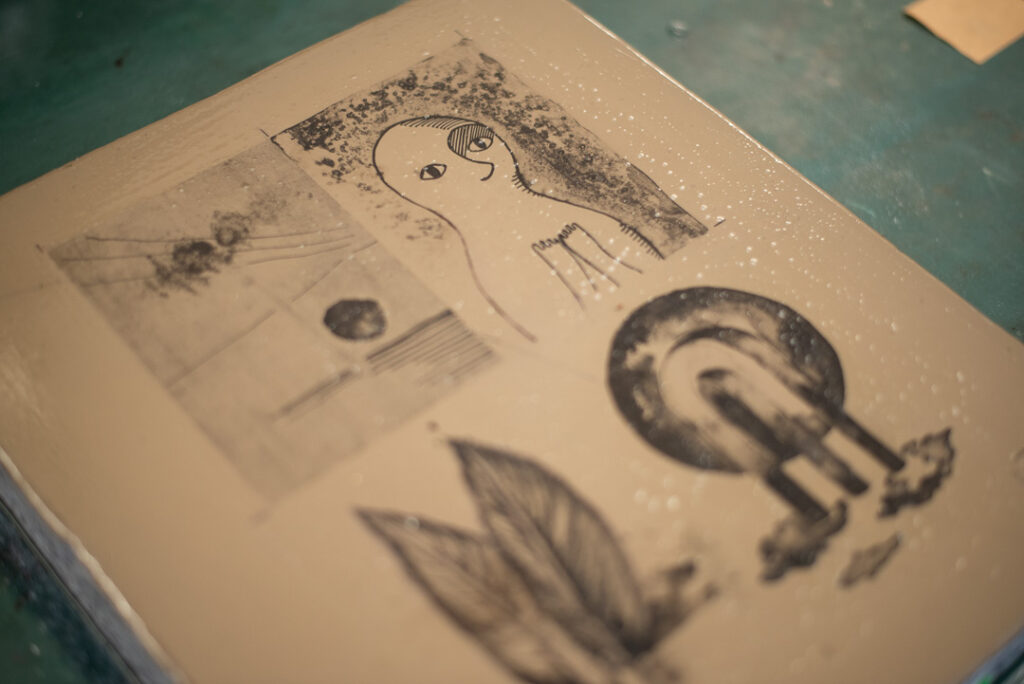
2. Drawing
On the neutral stone you can:

- draw with lithographic chalk and/or
- work with lithographic ink: pen and brush drawing, wash technique, spray technique
3. Preparation – Etching
The stone can be etched in different ways depending on the motif and type of drawing:
- With gum arabic dissolved in water, smooth for approx. 3 to 24 hours and polish with cheesecloth.
- With light etching gum (0.625 to 2.5 % nitric acid) for approx. 30 to 180 seconds.
- With strong etching rubber (2.5 to 5 % nitric acid) for approx. 30 to 180 seconds.
- On the dry stone.
- On the stone moistened with fresh gum arabic.
After each etching process, the gum arabic and/or etching gum should be washed off, the stone dried, the drawing talcum-coated and then its surface polished with a little bit of gum arabic.
The etching rubber can be applied by hand or with a sponge, linen cloth or brush.
The first etching is made on the stone drawn with ink or chalk. Before the second etching, the ink and chalk must be removed and replaced with pen ink, which is significantly more acid-resistant. To do this, the gummed stone is first rubbed with turpentine balsam oil and then with elutriation tincture. These two liquids only work on the drawn areas, as the exposed areas remain covered with gum arabic (gum arabic is only soluble in water).
Let the stone dry, then rinse thoroughly with a sponge and clean water. Roll the feather ink onto the damp surface (not wet! No water beads should be visible) until the pattern no longer looks brownish but black. Let the stone dry again, dab with talc, and then polish with gum arabic.
Lightly loosen the surface with a little water and/or gum arabic, and begin the second etching. The stone is then thoroughly rinsed and can either be kept moist and printed, or allowed to dry, polished with gum arabic, and stored.
4. Preparation of the printing press
Um einen erfolgreichen Druckdurchlauf ohne gebrochene Steine bzw. »gefaltetes« oder »schiefes« Druckpapier zu erreichen, wird der Stein mit Hölzern auf dem Druckwagen »arretiert«, die Druckpapieranlage eingerichtet, der Reiber entsprechend Steingröße eingebaut und in Druckstellung auf Höhe voreingestellt und gefettet. Auch der Pressspan/die »Reiberpappe« muß gefettet werden. Nun beginnt das Einfärben des feuchten Steins (siehe Drucken). Da das Druckbild bei diesem Vorgang (ca. 3 × Einwalzen) noch nicht die für die Auflage optimale Farbführung hat und die Einstellung der Maschine ein wenig Zeit benötigt, wird für den Andruck entsprechendes Papier verwendet. Dieses auf den Stein, darüber die Zwischenlage und die Reiberpappe auflegen. Den Druckwagen vorfahren bis der Reiber sich knapp auf/über dem Stein befindet – diesen »Druckbeginn« markieren. Den Reiber mittels »Bengel« senken und heben – dabei die Druckkraft (ca. 350–400 bar 35.000.000 Pascal) per Handrad nach Erfahrung und mit Gefühl einstellen. Nun den Wagen bei Reiber-in-Druckstellung zügig weiterbewegen bis sich der Reiber noch knapp auf/über dem Stein befindet, Reiber heben und dieses »Druckende« markieren.
To ensure a successful print run without broken blocks or folded or crooked printing paper, the block is secured to the printing carriage with wooden blocks, the printing paper feed is set up, the rubbing device is installed according to the block size, pre-adjusted to the printing height, and greased. The pressboard/rubbing board must also be greased. Now, the inking of the wet block begins (see Printing). Since the printed image does not yet have the optimal ink flow for the print run during this process (approximately 3 roller passes), and setting up the press requires some time, appropriate paper is used for the proof. Place this paper on the block, then the interleaf and rubbing board over it. Move the printing carriage forward until the rubbing device is just on/above the block – mark this »start of printing«. Lower and raise the rasp using the lever, adjusting the pressure (approx. 350–400 bar, 35,000,000 Pascal) using the handwheel based on experience and feel. Now, with the rasp in the pressure position, continue to move the carriage quickly until the rasp is just above/on the stone. Raise the rasp and mark this »end of pressure«.
CAUTION: Never release the crank while the friction device is at the »start« or »end« of pressure!
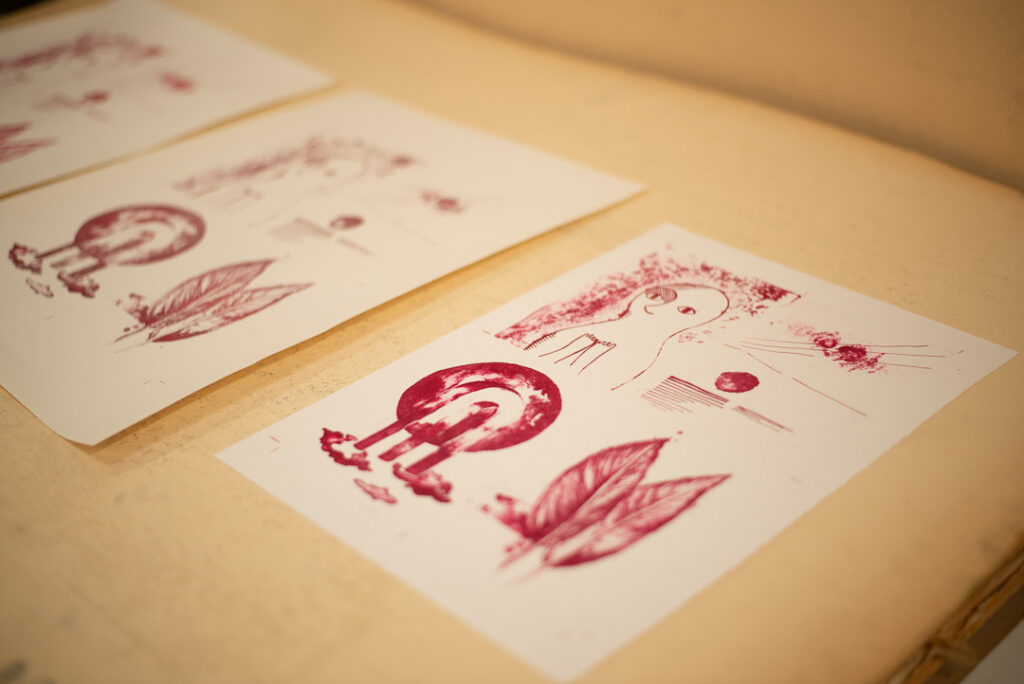
Now carefully peel off the printed paper with both hands, moistening the stone with the »third« hand. If this proof shows no serious defects, three to five proofs are usually necessary to achieve the desired color intensity. After that, you can begin printing on the original paper.
5. Printing
Moisten the stone with water using a sponge. Moisten the back of the paper with the sponge provided, first moisten the back, then the printing side. Now moisten the stone again with a sponge, ensuring that the surface moisture remains minimal (no water droplets). Ink the stone with a hand roller and moisten again. If necessary, clean the stone surface of any ink from areas not to be printed, then moisten. Repeat the process until the image has the required amount of ink for printing. Place the moistened, surface-dry paper, interleaf, and printing rubbing board on top. Move the carriage under the rubbing device until printing begins, press down the rubbing device using the hand lever, continue moving the carriage until printing ends, raise the rubbing device, return the carriage to its original position, and remove the rubbing board/interleaf. Now carefully peel off the printed paper with both hands, moistening the stone with your »third« hand, and then place the printed paper on/in the cardboard dryer. Here it can now be tested and evaluated for quality and should dry for about 3-4 days between the moisture-absorbing cardboard.
6. Correction options
If necessary, roll the stone, dry it, talc it, and correct it by scraping it away (+ 5% etching) or briefly remove the separating layer with vinegar (5%) (approx. 1 minute). Then rinse and dry again. The pattern can now be added to or corrected by scraping it away (+ 5% etching). The preparation process now follows.
7. Erasing the »drawing« on the stones
The residual printing ink is best removed immediately after printing. It is then washed/rubbed off the wet stone with turpentine balsam oil. Keep it wet and rinse with water! The following grinding process (two stones with the drawing sides facing each other) is intended to make the stones flat again, visually and chemically remove the old drawing, and prepare them for a new drawing. Corundum sand with a grain size of 80 (coarse) is used as the abrasive. To deacidify (removing the chemical structure of the old drawing/grease particles) between the first and second coarse blotting grinds, we use 15% acetic acid on the dry stone. Afterwards, the stone must be thoroughly rinsed again! We check the flatness of the stone with a steel ruler and round the edges with a fine file. If the stone surface is concave or convex due to incorrect grinding or excessive etching, the raised areas must be removed/leveled with a »corrective« or »straight grinding«. Now they are marked and placed on the stone shelf, where they »wait« for their next use.
History
Developed in 1798 by Alois Senefelder – he called it »chemical printing« – lithography achieved great importance in reproduction. Senefelder originally sought a cheap technique for producing theater posters, preferably in multiple colors. After extensive research, he developed the lithographic technique as well as the first hand and friction presses. Known as the granddaughter of the modern offset printing process, it was used industrially until around 1920. In offset printing, stones are replaced by aluminum plates and cylinders, which increases speed and accuracy.
Goya, Daumier, Matisse, Picasso, Miró, Chagall, Tàpies und Rauschenberg, um nur einige zu nennen, schufen mit der Lithographie hervorragende Werke. Und jeder kennt die mehrfarbigen Plakate von Henri Toulouse-Lautrec. Heutzutage bestätigen alle Lithographen ihren Reiz und ihre Lebendigkeit. Sämtliche Lithographiesteine, die weltweit heute zum Einsatz kommen, stammen aus Solnhofen in Niederbayern. Aus dem Kalkschieferplatten in der Region werden Steine mit spezieller Dichte und Reinheit gewonnen. Diese bildeten sich vor ca. 60–150 Millionen Jahren aus Ablagerungen von unzähligen kleinsten Einzellern mit Einschlüssen von Fossilien im »Urmeer«.
Goya, Daumier, Matisse, Picasso, Miró, Chagall, Tàpies, and Rauschenberg, to name just a few, created outstanding works with lithography. And everyone knows the multicolored posters of Henri Toulouse-Lautrec. Today, all lithographers acknowledge its appeal and vibrancy. All lithographic stones used worldwide today come from Solnhofen in Lower Bavaria. Stones of particular density and purity are mined from the region’s limestone slate. These stones formed approximately 60–150 million years ago from deposits of countless tiny single-celled organisms with fossil inclusions in the »primordial ocean«.
Signing of prints
according to the »rules« by Lothar Lang, Der Graphiksammler, Berlin 1979
On the left side under the print, prints before the edition are marked with Roman numerals, possibly also as a proof = E.E., or as a proof for the artist (number = 10% of the edition size) = e.a./E.A. = Épreuves d’artiste = A.P., or outside the sale = h.c. = hors commerce; the edition, if the printing sequence is known, is marked as a fraction, with the serial number in the numerator and the edition number in the denominator. (Otherwise always 1–number of print run).
On the right is the signature and the date of creation, in the center a possible title and/or cycle. Sometimes the technique is also noted here.